Water appearing near a chimney often gets called a flashing leak, but the stain alone cannot identify the entry point. Flashing, shingles, the crown, masonry, caps and condensation can create overlapping symptoms, so the repair should follow a complete water-path inspection.
What chimney flashing is supposed to do
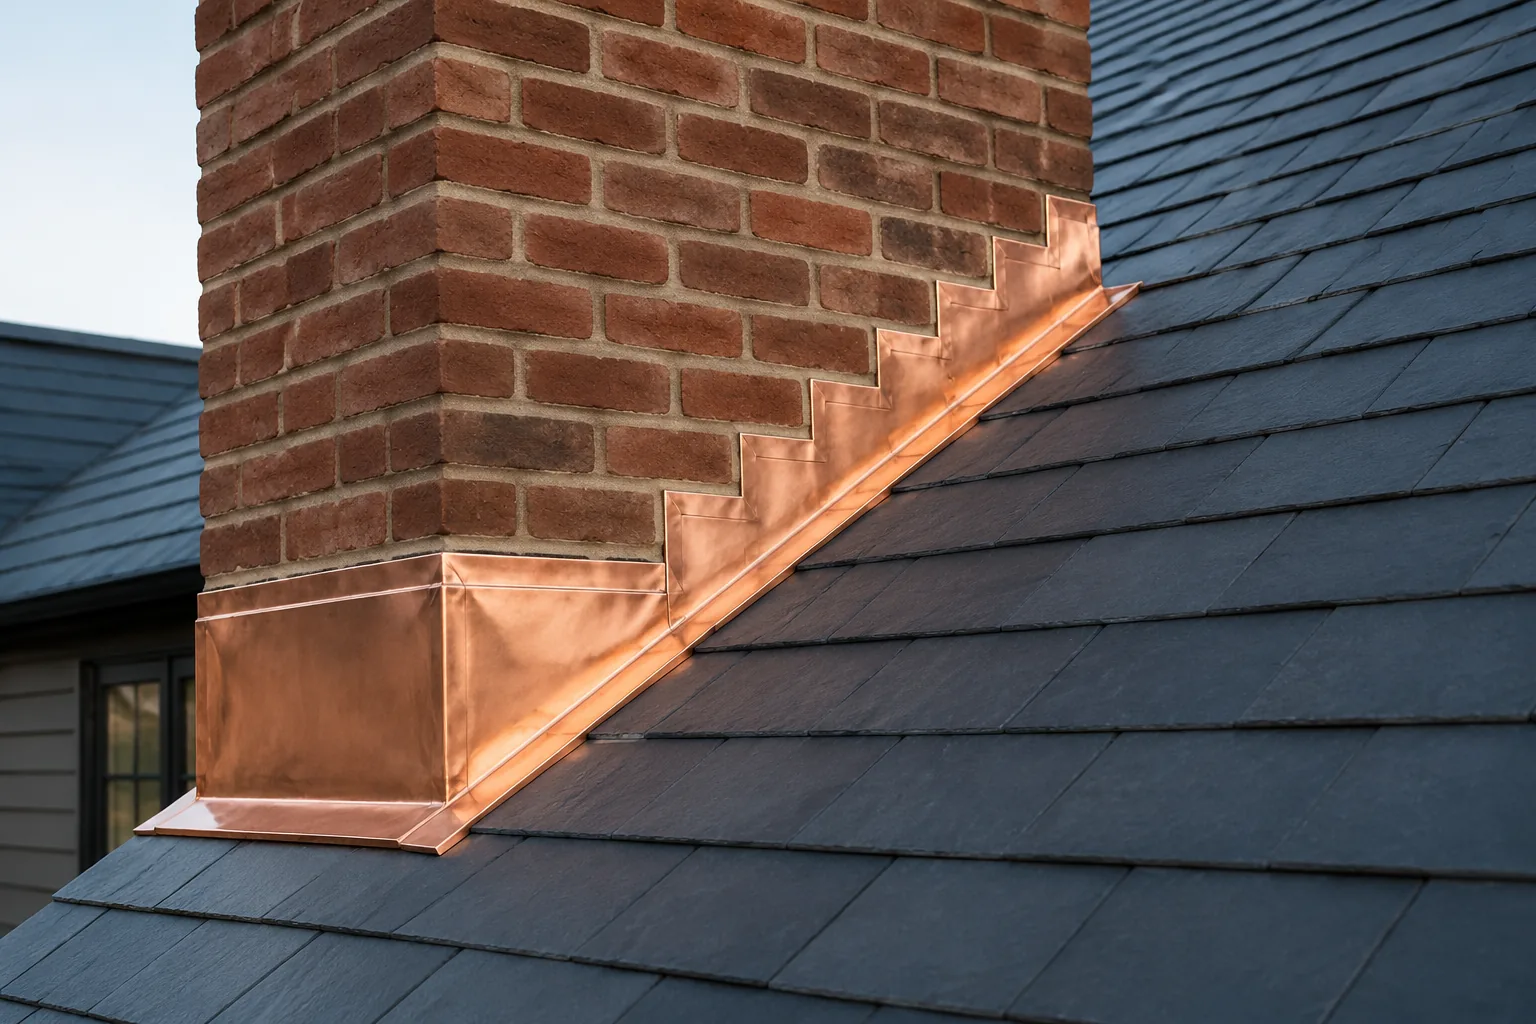
Flashing is the water-management system where the roof meets the chimney. On a typical sloped shingle roof, apron or base flashing protects the downhill side, individual pieces of step flashing overlap the shingle courses along the sides, and counterflashing covers the upper edges where the metal meets the masonry. Behind the chimney, a back pan or cricket may be part of the design depending on the roof, chimney and local requirements.
These pieces work through overlap and drainage. The International Residential Code model provisions call for flashing at wall-and-roof intersections and around roof openings, while its chimney provisions address flashed and counterflashed cricket intersections. The exact detail for a New Jersey home still depends on the adopted local code, roof covering, roof slope and chimney dimensions.
- Apron or base flashing at the downhill face
- Step flashing woven with shingle courses along the sides
- Counterflashing that protects the top edge of the base and step flashing
- A back pan or cricket where the roof and chimney configuration calls for one
Warning signs are clues, not proof
Ceiling stains, damp roof sheathing in the attic, water running down the chimney, loose metal, open joints, corrosion or repeated sealant failure all justify an inspection. The timing also helps: wind direction, snowmelt and long soaking rain can affect where water enters and where it finally becomes visible.
Water can travel along framing, masonry or the underside of the roof deck before it drips. A stain beside the chimney may come from flashing, but it may also involve damaged shingles, an open crown, absorbent masonry, a missing cap, a failed chase cover, nearby roof details or condensation inside a venting system. A responsible diagnosis separates observed defects from suspected paths.
Why a caulk-only patch may not solve the leak
Sealant can be appropriate at specific joints when it is compatible with the metal, masonry and roof material. It is not a substitute for missing, incorrectly lapped or badly corroded flashing. Roofing manufacturer GAF cautions that relying on caulk alone at a chimney can fail as the material breaks down, while step flashing and counterflashing provide the layered water-shedding detail.
A heavy surface coating may temporarily hide an opening without correcting how water moves through the assembly. Before adding more sealant, the metal edges, laps, masonry joint or reglet, fasteners, shingles and uphill drainage should be checked so the repair addresses the actual weak point.
When repair may be enough—and when replacement is considered
A localized repair may be reasonable when the metal remains sound, the underlying flashing is correctly integrated with the roof and a limited counterflashing joint has opened. Work might involve careful cleaning, refastening or restoring a compatible joint detail without disturbing serviceable surrounding materials.
Replacement is more likely when flashing is missing, rusted through, punctured, improperly overlapped, detached from the masonry or buried beneath layers of unsuccessful patches. If shingles must be lifted or replaced, chimney and roofing work should be coordinated so the finished assembly remains layered in the correct drainage order.
Asphalt shingles, slate, metal roofing and low-slope membranes do not use one universal detail. The written scope should name the roof type, flashing components and materials rather than promising a generic seal around the chimney.
What a useful leak inspection and estimate should include
The inspection should consider the visible interior moisture pattern, attic or roof-deck evidence when accessible, the chimney base, shingles or roof membrane, counterflashing, crown, caps, masonry joints and the uphill side of the chimney. Complex leaks may need observation during weather or controlled water testing performed in stages.
An estimate should identify which source is confirmed, which remains likely, what materials will be removed or reused and how the roof and masonry will be restored. It should also explain whether the scope includes step flashing, apron flashing, counterflashing, a back pan or cricket, sealants, affected shingles and before-and-after documentation.
- The evidence supporting the proposed repair
- Metal type and the flashing components included
- How roofing and masonry will be opened and restored
- Whether additional testing is needed if the first source is not confirmed
Safe checks a homeowner can make
Roofing manufacturer IKO recommends checking ceilings and accessible attic areas for water stains and looking from ground level for detached or deformed flashing around chimneys. Note when the leak occurs, take photos and keep the area below protected, but do not climb onto a wet, steep or unfamiliar roof. Roof access and removal of materials should be left to people equipped for the work.
What to remember
- A stain near the chimney does not identify the entry point by itself.
- Good flashing relies on layered metal and drainage, not a surface bead of caulk alone.
- The repair scope should name the defective component and how roofing and masonry will be restored.
This guide is general homeowner education. A site inspection, appliance information and local requirements determine the appropriate scope for a specific chimney.